Thursday, May 1, 2014

Adding Disks to ASM diskgroup Manually

Oracle: $ sqlplus / as sysdba

SQL*Plus: Release 11.2.0.2.0 Production on Mon Apr 21 17:14:46 2014

Copyright (c) 1982, 2010, Oracle.  All rights reserved.

Connected to:
Oracle Database 11g Enterprise Edition Release 11.2.0.2.0 - 64bit Production
With the Partitioning and Automatic Storage Management options

SQL> select GROUP_NUMBER, NAME,TOTAL_MB, FREE_MB, USABLE_FILE_MB from V$ASM_DISKGROUP;

GROUP_NUMBER     NAME                         TOTAL_MB    FREE_MB       USABLE_FILE_MB
-----------------------         ----------------                ----------           ----------         --------------
                 1                DATA                                           221181     128900         128900
                 2                ORAARCH                                     73727      73675          73675
                 3                 REDO                                               8191       1902           1902


SQL>  select disk_number, mode_status, name, path from v$asm_disk where group_number = 3 order by disk_number, name ;

DISK_NUMBER  MODE_ST     NAME                           PATH
------------------   ------------      ---------------------       ---------------
          0              ONLINE         REDO01                         ORCL:REDO01

From above we see REDO diskgroup has only I disk(REDO01)

Now to check the available disks on server to add them to  ASM diskgroup

SQL> select path, header_status, mode_status from v$asm_disk;

PATH            HEADER_STATU     MODE_ST
--------------- ----------------      ----------
ORCL:DATA01     MEMBER       ONLINE
ORCL:DATA02     MEMBER       ONLINE
ORCL:DATA03     MEMBER       ONLINE
ORCL:ORAARCH01  MEMBER       ONLINE
ORCL:REDO01     MEMBER       ONLINE
ORCL:REDO08     PROVISIONED  ONLINE
ORCL:REDO07     PROVISIONED  ONLINE
ORCL:REDO06     PROVISIONED  ONLINE
ORCL:REDO05     PROVISIONED  ONLINE
ORCL:REDO04     PROVISIONED  ONLINE
ORCL:REDO03     PROVISIONED  ONLINE
ORCL:REDO02     PROVISIONED  ONLINE

12 rows selected.


SQL> ALTER DISKGROUP REDO ADD DISK 'ORCL:REDO02';
ALTER DISKGROUP REDO ADD DISK 'ORCL:REDO02'
*
ERROR at line 1:
ORA-15000: command disallowed by current instance type


SQL> exit
Disconnected from Oracle Database 11g Enterprise Edition Release 11.2.0.3.0 - 64bit Production
With the Partitioning and Automatic Storage Management options
oracle $:/opt/oracle
oracle:$  export ORACLE_SID=+ASM1
oracle :$ export ORACLE_HOME=
oracle :$ export PATH=
oracle:+ASM-> sysdba

SQL*Plus: Release 11.2.0.3.0 Production on Mon Apr 21 17:41:11 2014

Copyright (c) 1982, 2011, Oracle.  All rights reserved.


Connected to:
Oracle Database 11g Enterprise Edition Release 11.2.0.3.0 - 64bit Production
With the Automatic Storage Management option

SQL>  ALTER DISKGROUP REDO ADD DISK 'ORCL:REDO02';
 ALTER DISKGROUP REDO ADD DISK 'ORCL:REDO02'
*
ERROR at line 1:
ORA-15032: not all alterations performed
ORA-15260: permission denied on ASM disk group


NOTE: According to Doc ID 889810.1 logging in with SYSDBA privilege, that is not allowed for ASM operations

SQL> conn / as sysasm

SQL*Plus: Release 11.2.0.3.0 Production on Mon Apr 21 17:42:38 2014

Copyright (c) 1982, 2011, Oracle.  All rights reserved.


Connected to:
Oracle Database 11g Enterprise Edition Release 11.2.0.3.0 - 64bit Production
With the Automatic Storage Management option

SQL> set linesize 280
SQL> col path format a15
SQL> select disk_number, mode_status, name, path from v$asm_disk where group_number = 3 order by disk_number, name ;

DISK_NUMBER   MODE_ST    NAME                           PATH
----------------    ------------- ---------------------- ---------------
               0        ONLINE      REDO01                         ORCL:REDO01

Now add 1 disk to REDO Disk group:

SQL> ALTER DISKGROUP REDO ADD DISK 'ORCL:REDO02';
Diskgroup altered.

SQL> select disk_number, mode_status, name, path from v$asm_disk where group_number = 3 order by disk_number, name ;

DISK_NUMBER    MODE_ST       NAME                           PATH
----------------     ----------------    ------------------------ ---------------
          0       ONLINE        REDO01                         ORCL:REDO01
          1       ONLINE       REDO02                         ORCL:REDO02


SQL> select path, group_number group_#, disk_number disk_#, mount_status, header_status, state, total_mb, free_mb  from v$asm_disk order by group_number; 

PATH               GROUP_#     DISK_# MOUNT_S HEADER_STATU STATE      TOTAL_MB    FREE_MB
--------------- ---------- ---------- ------- ------------ -------- ---------- ----------
ORCL:REDO03              0          1 CLOSED  PROVISIONED  NORMAL            0          0
ORCL:REDO04              0          2 CLOSED  PROVISIONED  NORMAL            0          0
ORCL:REDO05              0          3 CLOSED  PROVISIONED  NORMAL            0          0
ORCL:REDO06              0          4 CLOSED  PROVISIONED  NORMAL            0          0
ORCL:REDO07              0          5 CLOSED  PROVISIONED  NORMAL            0          0
ORCL:REDO08              0          6 CLOSED  PROVISIONED  NORMAL            0          0
ORCL:DATA01              1          0 CACHED  MEMBER       NORMAL        73727      42968
ORCL:DATA02              1          1 CACHED  MEMBER       NORMAL        73727      42965
ORCL:DATA03              1          2 CACHED  MEMBER       NORMAL        73727      42967
ORCL:ORAARCH01           2          0 CACHED  MEMBER       NORMAL        73727      73675
ORCL:REDO01              3          0 CACHED  MEMBER       NORMAL         8191       2408
ORCL:REDO02              3          1 CACHED  MEMBER       NORMAL         8191       7683

12 rows selected.

From the above output ORCL:REDO02 now became MEMBER from PROVISIONED status

Now check the ASM rebalancing

SQL> select group_number, operation, state, power, actual, sofar, est_work, est_rate, est_minutes from v$asm_operation;

GROUP_NUMBER    OPERA    STAT      POWER     ACTUAL      SOFAR   EST_WORK   EST_RATE    EST_MINUTES
---------------------           ---------   ----------   ----------     ----------           ----------          ----------        -----------          ------------
                   3                REBAL             RUN           1                1             1712           3148                   1104           1

SQL> /

GROUP_NUMBER    OPERA    STAT      POWER     ACTUAL      SOFAR   EST_WORK   EST_RATE    EST_MINUTES
------------------------        ---------      ----------    ----------     ----------        ----------      ----------         -----------          ------------
                     3              REBAL             RUN           1               1                     3142       3148                   1145           0


SQL> select GROUP_NUMBER, NAME,TOTAL_MB, FREE_MB, USABLE_FILE_MB from V$ASM_DISKGROUP;

GROUP_NUMBER      NAME                 TOTAL_MB    FREE_MB      USABLE_FILE_MB
----------------------        -----------------      -------------     -----------          --------------
           1           DATA                                221181     128900         128900
           2           ORAARCH                          73727      73675          73675
           3           REDO                                16382      10091          10091


After adding all the remaining disks…..


SQL> select GROUP_NUMBER, NAME,TOTAL_MB, FREE_MB, USABLE_FILE_MB from V$ASM_DISKGROUP;

GROUP_NUMBER          NAME            TOTAL_MB     FREE_MB          USABLE_FILE_MB
----------------------        ----------------       ---------------     ----------             --------------
           1                  DATA                               221181     128900         128900
           2                  ORAARCH                          73727      73675          73675
           3                   REDO                                 65516      59213          59213


From 11gr2 we can also add/delete/alter disks/volumes using ASMCA(ASM configuration assistant) 
see [Doc ID 885780.1]


Friday, April 25, 2014

OGG-00730 No minimum supplemental logging is enabled.

My GG version: 11.2.1.0.x
OS version:  RHEL 5.x
Oracle version: 11.2.0.2

 Extract ABENDS with below error

ERROR   OGG-00730  No minimum supplemental logging is enabled. This may cause extract process to handle key update incorrectly if key column is not in first row piece.

This error occurs when we haven't yet enabled supplemental logging on the database level but when I check my database it has supplemental logging enabled

SQL> SELECT force_logging, supplemental_log_data_min FROM v$database;

FOR SUPPLEME
--- --------
YES YES

SQL> archive log list
Database log mode              Archive Mode
Automatic archival             Enabled
Archive destination            USE_DB_RECOVERY_FILE_DEST
Oldest online log sequence     5
Next log sequence to archive   6
Current log sequence           6

Solution:        This is a BUG, [1571665.1]
           Added undocumented parameter “TRANLOGOPTIONS DISABLESUPPLOGCHECK” parameter to extract and once started then removed it from paramfile and everything worked fine

Thursday, April 24, 2014

Generate GOLDENGATE Encryption Keys using Keygen


My GG version: 11.2.1.0.x
OS version:  RHEL 5.x
Oracle version: 11.2.0.2

In order to generate keys, run the keygen command from the GoldenGate software installation home

KEYGEN   key length   n

Where:
(key length) is the encryption key length, up to 128 bits.
(n) represents the number of keys to generate.


oracle@oradev01:/opt/oracle/GGATE  $ ./keygen  128 4
0x022A972B7CF6EF537DBCF35792BEH321

0x03CC8167B516426D9CA3A70B5B1FDW12

0x066E6C23EF369406BA8A5B3F2580DF54

0x0A10575F2857E61FD8710F73EFE08H11


Save the file as the name ENCKEYS in all upper case letters, without an extension, in the Oracle GoldenGate installation directory.

oracle@oradev01:/opt/oracle/GGATE $  vi ENCKEYS

oracle@oradev01:/opt/oracle/GGATE $ cat ENCKEYS
key1 0x022A972B7CF6EF537DBCF35792BEH321
key2 0x03CC8167B516426D9CA3A70B5B1FDW12
key3 0x066E6C23EF369406BA8A5B3F2580DF54
key4 0x0A10575F2857E61FD8710F73EFE08H11

Copy this ENCKEYS file to all the target servers in the GG home location. The key names and values in all of the ENCKEYS files must be identical, or else the data exchange will fail

oracle@oradev01:/opt/oracle/GGATE $ ./ggsci

Oracle GoldenGate Command Interpreter for Oracle
Version 11.2.1.0.3 14400833 OGGCORE_11.2.1.0.3_PLATFORMS_120823.1258_FBO
Linux, x64, 64bit (optimized), Oracle 11g on Aug 23 2012 20:20:21

Copyright (C) 1995, 2012, Oracle and/or its affiliates. All rights reserved.

GGSCI (oradev01) 1> encrypt password gguser123
Expecting either 'ENCRYPTKEY' or an encryption algorithm

we need to give encrypt key which is specified in ENCKEYS file

GGSCI (oradev01) 2> encrypt password gguser123 ENCRYPTKEY key1
Encrypted password:  AADAAAAAAAAAAAKAVHWAGJIGWBGHDBRAGJMIPEQEXBYEMDYIRBICFHSCTDHHEJHANCKAUDDGQJPBHRDT
Algorithm used:  AES128

Check whether you can able to connect with this encrypted password

GGSCI (oradev01) 3> dblogin USERID gguser@MYDB, PASSWORD AADAAAAAAAAAAAKAVHWAGJIGWBGHDBRAGJMIPEQEXBYEMDYIRBICFHSCTDHHEJHANCKAUDDGQJPBHRDT, encryptkey key1
Successfully logged into database.

GGSCI (oradev01) 3> dblogin USERID gguser@MYDB, PASSWORD gguser123
Successfully logged into database.

So you can use this encrypted password in your extract param file

GGSCI (oradev01) 4> edit params ext

GGSCI (oradev01) 6> view params ext

EXTRACT ext
USERID gguser@MYDB, PASSWORD AADAAAAAAAAAAAKAVHWAGJIGWBGHDBRAGJMIPEQEXBYEMDYIRBICFHSCTDHHEJHANCKAUDDGQJPBHRDT, encryptkey  key1
EXTTRAIL /opt/oracle/GGATE/dirdat/lt
………
…..
………….
SETENV NLS_LANG="AMERICAN_AMERICA.WE8ISO8859P1"
TABLE schema.table_name


NOTE:  The only way to protect this ENCKEYS file from other is through o/s privileges (Doc ID 1575452.1)


Thursday, April 3, 2014

Install Grid Agent from 11g OEM

To install Agent on the oracle linux server
Go to Deployments TAB from 11g Grid control page


Click on Install Agent, then the below screen will be appeared


Click on the links which you want to perform, here I click on Fresh install

NOTE: If we want to upgrade agent from 10g to 11gr1 then simply click on Upgrade agent, so no need to install 11g agent on the server it will automatically install 11g and upgrade from 10g to 11g.


Fill all the fields according to the environment.

Here you need to know the Management Server Registration Password  (OMS password) to continue.
Once done verify from the server : ./emctl status agent
Verify from grid control, it should show new oracle linux HOST

Run the .../agent11g/root.sh script (as root) as soon after installation is complete (or) you can check the "run root.sh" box if you have root access


Useful Standby database commands


To see if the MRP is running or not
 SQL> SELECT PROCESS, STATUS FROM V$MANAGED_STANDBY;

How to Check if Active Data Guard is Already Enabled :

SELECT 'Using Active Data Guard' ADG FROM V$MANAGED_STANDBY M, V$DATABASE D WHERE M.PROCESS LIKE 'MRP%' AND D.OPEN_MODE='READ ONLY';

ADG
-----------------------                                               (if ENABLED)
Using Active Data Guard                     


no rows selected.                                                              (if NOT ENABLED)


To start Redo Apply, issue the following statement:
SQL> ALTER DATABASE RECOVER MANAGED STANDBY DATABASE DISCONNECT FROM SESSION;

To stop recovery of a standby database:
SQL>   ALTER DATABASE RECOVER MANAGED STANDBY DATABASE CANCEL;

On primary:
SQL >  SELECT THREAD# "Thread",SEQUENCE# "Last Sequence Generated"
FROM V$ARCHIVED_LOG
WHERE (THREAD#,FIRST_TIME ) IN (SELECT THREAD#,MAX(FIRST_TIME) FROM V$ARCHIVED_LOG GROUP BY THREAD#) ORDER BY 1;

On Standby:
SELECT ARCH.THREAD# "Thread", ARCH.SEQUENCE# "Last Sequence Received", APPL.SEQUENCE# "Last Sequence Applied", (ARCH.SEQUENCE# - APPL.SEQUENCE#) "Difference"
FROM
(SELECT THREAD# ,SEQUENCE# FROM V$ARCHIVED_LOG WHERE (THREAD#,FIRST_TIME ) IN (SELECT THREAD#,MAX(FIRST_TIME) FROM V$ARCHIVED_LOG GROUP BY THREAD#)) ARCH,
(SELECT THREAD# ,SEQUENCE# FROM V$LOG_HISTORY WHERE (THREAD#,FIRST_TIME ) IN (SELECT THREAD#,MAX(FIRST_TIME) FROM V$LOG_HISTORY GROUP BY THREAD#)) APPL
WHERE ARCH.THREAD# = APPL.THREAD# ORDER BY 1;

Check Archive gap on Standby:
SELECT THREAD#, LOW_SEQUENCE#, HIGH_SEQUENCE# FROM V$ARCHIVE_GAP;

Check the max log sequence on Primary DB
 SELECT Max(sequence#) FROM   v$log_history;


# check the last log applied on STANDBY
SELECT thread#,   Max(sequence#) "Last Standby Seq Applied"
FROM   v$archived_log   WHERE  applied = 'YES'  GROUP  BY thread#   ORDER  BY 1;
 

SQL> SELECT * FROM V$DATAGUARD_STATS WHERE NAME=’transport lag’;
SQL> SELECT * FROM V$DATAGUARD_STATS WHERE NAME=’apply lag’;


On primary:  (Where dblink_stby à dblink on the primary that points to the standby database )
SQL> select scn_to_timestamp((select current_scn from v$database))-scn_to_timestamp((select current_scn from v$database@dblink_stby)) from dual;
The value returned from the query indicates the number of seconds that data on the standby lags behind the current position of the primary database.


Find Redo GAP: (on STANDBY)
SQL> select * from v$archive_gap;

thread#    low_sequence#    high_sequence#
---------------------------------------------------------------------------
2              222                   222
3              341                   342


Identify missing archive logs from above output:
SQL> select name from v$archived_log where thread# = 2 and dest_id = 2 and sequence# = 222;


Thursday, January 16, 2014

How to add new tables for running OGG extract and replicat

There are two ways to add the new tables for OGG replication 

à using handlecollision
à
without using handlecollisions

A) using handlecollisions
----------------------------
1)stop the extract,pump and replicat
 once the extract is stopped, wait for the pump to catch up before stopping it.
 once the pump is stopped, wait for the replicat to catch up before stopping it.
2)Enable Supplemental Logging at Table Level on source side
 GGSCI> dblogin userid xxxxx password xxxxxx
GGSCI> add trandata <schema>.<tablename>
3)include the tables that you need to add into the extract parameter file and save it
4)start the extract
5)include the tables that you need to add into the extract pump parameter file and save it
6)start the pump
7)do the initial load for the the new tables( ie you can take the export and import of the new tables that need to to added for replication from source the target database)
8)Wait for the initial load(export and import) to be completed and then include the tables that you need to add into the replicat parameter file with HANDLECOLLISIONS parameter
eg: MAP hr.dep, TARGET hr.dep, HANDLECOLLISIONS;
MAP hr.country, TARGET hr.country, HANDLECOLLISIONS;

9) start the replicat
10) once the lag becomes zero remove the HANDLECOLLISIONS from the replicat parameter file and restart the replicat
eg :-
MAP hr.dep, TARGET hr.dep;
MAP hr.country, TARGET hr.country;

NOTE:-  step 4 and 5 can be skipped if the pump is not configured.


B)without using handlecollision
--------------------------------------
1) stop the extract,pump and replicat
once the extract is stopped, wait for the pump to catch up before stopping it.
        once the pump is stopped, wait for the replicat to catch up before stopping it.
2)Enable Supplemental Logging at Table Level on source side
GGSCI> dblogin userid xxxxx password xxxxxx
GGSCI> add trandata <schema>.<tablename>  
3)add the new table in extract parameter file and save it
4)start the extract
5)add the new table in extract pump parameter file and save it
6)start the extract pump
7)get the current SCN from the source database
eg:-
SQL> select current_scn from v$database;

CURRENT_SCN
------------------------
5343407

8) Check that there are no open DML transactions against the table. If there are open transactions, make sure that their starting SCN is higher than the one obtained in step 4) , i.e. 5343407

9)re-sync the the newly added table from source to target(using normal export/import).
Make sure to use FLASHBACK_SCN parameter for the export.

10) Add the table in the replicat parameter file including the below option( FILTER ( @GETENV ("TRANSACTION", "CSN") > <scn_number obtained from source db>) )as shown in the below example
eg:-
MAP source.test1, TARGET target.test1 ,
FILTER ( @GETENV ("TRANSACTION", "CSN") > 5343407);
MAP source.test2, TARGET target.test2 ,FILTER ( @GETENV ("TRANSACTION", "CSN") > 5343407);

11)start the replicat

12)verify the tables on source and table and once the lag is zero remove the filter parameter from the replicat parameter file and restart.


NOTE:  if you are using HANDLECOLLISIONS method, and if you are doing on a table with no Primary key and unique key then you might end up with Duplicate data in the table, so i prefer you go always with WITHOUT HANDLECOLLISIONS method in these cases.

Ref:[ Doc ID 1332674.1]


Friday, November 1, 2013

ORA-38500: Unsupported operation: Oracle XML DB not present

when i'm trying to do schema import with content=data_only option then i got this error below

ORA-31693: Table data object "SCOTT"."TEST" failed to load/unload and is being skipped due to error:
ORA-38500: Unsupported operation: Oracle XML DB not present

Then i checked the XDB status and it is installed and VALID status but still getting this error during the import

SQL> select substr(comp_id,1,15) comp_id, substr(comp_name,1,35) comp_name, substr(version,1,10) version, status from dba_registry order by modified;

COMP_ID         COMP_NAME                           VERSION    STATUS
--------------- ----------------------------------- ---------- -----------
EM                  Oracle Enterprise Manager           11.2.0.3.0   VALID
CATPROC         Oracle Database Packages and Types  11.2.0.3.0   VALID
CATALOG         Oracle Database Catalog Views       11.2.0.3.0   VALID
OWM               Oracle Workspace Manager            11.2.0.3.0 VALID
CATJAVA         Oracle Database Java Packages       11.2.0.3.0 VALID
XDB               Oracle XML Database                 11.2.0.3.0 VALID
CONTEXT         Oracle Text                         11.2.0.3.0 VALID
EXF                Oracle Expression Filter            11.2.0.3.0 VALID
JAVAVM          JServer JAVA Virtual Machine        11.2.0.3.0 VALID
XML             Oracle XDK                          11.2.0.3.0 VALID
RUL             Oracle Rules Manager                11.2.0.3.0 VALID

COMP_ID         COMP_NAME                           VERSION    STATUS
--------------- ----------------------------------- ---------- -----------
ORDIM           Oracle Multimedia                   11.2.0.3.0 VALID
SDO             Spatial                             11.2.0.3.0 VALID
AMD             OLAP Catalog                        11.2.0.3.0 VALID
APS             OLAP Analytic Workspace             11.2.0.3.0 VALID
XOQ             Oracle OLAP API                     11.2.0.3.0 VALID
OWB             OWB                                 11.2.0.2.0 VALID
APEX            Oracle Application Express          3.2.1.00.1 VALID

18 rows selected.

After researching, according to Doc ID 1375713.1, The DBMS_METADATA_DIFF package was not completely compiled when it was created.
then  performed the below steps

SQL> alter package dbms_metadata_int compile plsql_ccflags = 'ku$xml_enabled:true';
Package altered.

SQL> alter package dbms_metadata_util compile plsql_ccflags = 'ku$xml_enabled:true';
Package altered.

and started import again then it WORKED !!

More on XDB :

Wednesday, October 2, 2013

Uninstall Oracle GOLDENGATE on LINUX

1. Log on to the database server (as oracle) where the GoldenGate software is installed.

cd /home/oracle/ggs

2. Start GGSCI:

./ggsci

3. Stop all GoldenGate processes:

GGSCI (dbserver1) 1> stop EXTRACT *

or

GGSCI (dbserver1) 1> stop REPLICAT *

Then:

GGSCI (dbserver1) 2> stop MGR

Manager process is required by other GGS processes.

Are you sure you want to stop it (y/n)? y

Sending STOP request to MANAGER …

Request processed.

Manager stopped.

GGSCI (dbserver1) 3> exit

4. Change directory to the installation directory:

cd /home/oracle

5. Remove the GoldenGate files:

rm -rf ggs

6. Logon to the Oracle database as SYSDBA and drop the GoldenGate Admin user. Include the CASCADE keyword:

oracle@host.com:/opt/oracle INT$ sqlplus / as sysdba

SQL*Plus: Release 11.2.0.2.0 Production on Mon Jul 1 19:19:23 2013

Copyright (c) 1982, 2010, Oracle.  All rights reserved.


Connected to:
Oracle Database 11g Enterprise Edition Release 11.2.0.2.0 - 64bit Production
With the Partitioning, OLAP, Data Mining and Real Application Testing options

SQL> drop user gguser cascade;
drop user gguser cascade
*
ERROR at line 1:
ORA-00604: error occurred at recursive SQL level 2
ORA-20782: Oracle GoldenGate DDL Replication Error: Code :ORA-20782: Cannot
DROP object used in Oracle GoldenGate replication while trigger is enabled.
Consult Oracle GoldenGate documentation and/or call Oracle GoldenGate Technical
Support if you wish to do so., error stack: ORA-06512: at line 231
ORA-06512: at line 1030


SQL> select * from dba_triggers db where db.owner='GGUSER';
no rows selected

SQL>  SELECT a.obj#, a.sys_evts, b.nameFROM trigger$ a,obj$ b
WHERE a.sys_evts> 0AND a.obj#=b.obj#AND baseobject = 0;

      OBJ#   SYS_EVTS NAME
---------- ---------- ------------------------------
    204316       8256 EXPFIL_ALTEREXPTAB_MAINT
    204314        128 EXPFIL_DROPUSR_MAINT
    204464       4096 RLMGR_TRUNCATE_MAINT
    357922         64 CDC_ALTER_CTABLE_BEFORE
    357923         32 CDC_CREATE_CTABLE_AFTER
    357924         32 CDC_CREATE_CTABLE_BEFORE
    357925        128 CDC_DROP_CTABLE_BEFORE
     10520       8416 NO_VM_DDL
     10521        128 NO_VM_DROP_A
    204315         96 EXPFIL_RESTRICT_TYPEEVOLVE
    204313        128 EXPFIL_DROPOBJ_MAINT

      OBJ#   SYS_EVTS NAME
---------- ---------- ------------------------------
    805933     524256 GGS_DDL_TRIGGER_BEFORE
    203646       4224 XDB_PI_TRIG
      7743        128 AW_DROP_TRG
    341038       4096 AW_TRUNC_TRG
    341040       8192 AW_REN_TRG

16 rows selected.

SQL> drop trigger ggs_ddl_trigger_before;
Trigger dropped.

SQL> drop user gguser cascade;
User dropped.


Sunday, September 8, 2013

Install oracle 11.2.0.3 on Linux 64 bit

Download binaries from Oracle and SCP .zip files to server
Unzip both zip files and you will see “database” folder created.

oracle@t01odsdev201:/opt/oracle/11.2.0.3 INT$  cd database
oracle@t01odsdev201:/opt/oracle/11.2.0.3/database INT$  ls
doc  install  readme.html  response  rpm  runInstaller  sshsetup  stage  welcome.html
oracle@t01odsdev201:/opt/oracle/11.2.0.3/database INT$ export DISPLAY=10.109.38.156:0
oracle@t01odsdev201:/opt/oracle/11.2.0.3/database INT$ ./runInstaller
Starting Oracle Universal Installer...

Checking Temp space: must be greater than 120 MB.   Actual 3893 MB    Passed
Checking swap space: must be greater than 150 MB.   Actual 9565 MB    Passed
Checking monitor: must be configured to display at least 256 colors.    Actual 16777216    Passed

Preparing to launch Oracle Universal Installer from /tmp/OraInstall2013-09-05_03-55-01PM. Please wait ...oracle@t01odsdev201


Click on “fix& Check again” then it will prompt you to run script, then open a new terminal and run the script and check “ignore All” button and continue.


After finished running, it will prompt you to run root.sh script. Open a new terminal and run the script as root user.


Install oracle 12.1.0.1 database on Linux 64 bit

Download oracle 12c software and SCP .zip files to server
Unzip both zip files and you see “database” folder created.

oracle@t01odsdev201:/opt/oracle/12c INT$  unzip linuxamd64_12c_database_1of2.zip
oracle@t01odsdev201:/opt/oracle/12c INT$ unzip linuxamd64_12c_database_2of2.zip
oracle@t01odsdev201:/opt/oracle/12c INT$ ls
database  linuxamd64_12c_database_1of2.zip  linuxamd64_12c_database_2of2.zip

oracle@t01odsdev201:/opt/oracle/12c INT$ cd database
oracle@t01odsdev201:/opt/oracle/12c/database INT$ ls
install  response  rpm  runInstaller  sshsetup  stage  welcome.html

Invoke above “runInstaller” and then GUI will be seen

oracle@t01odsdev201:/opt/oracle/12c/database INT$ export DISPLAY=10.119.38.156:0
oracle@t01odsdev201:/opt/oracle/12c/database INT$ ./runInstaller
Starting Oracle Universal Installer...

Checking Temp space: must be greater than 500 MB.   Actual 3889 MB    Passed
Checking swap space: must be greater than 150 MB.   Actual 9781 MB    Passed
Checking monitor: must be configured to display at least 256 colors.    Actual 16777216    Passed
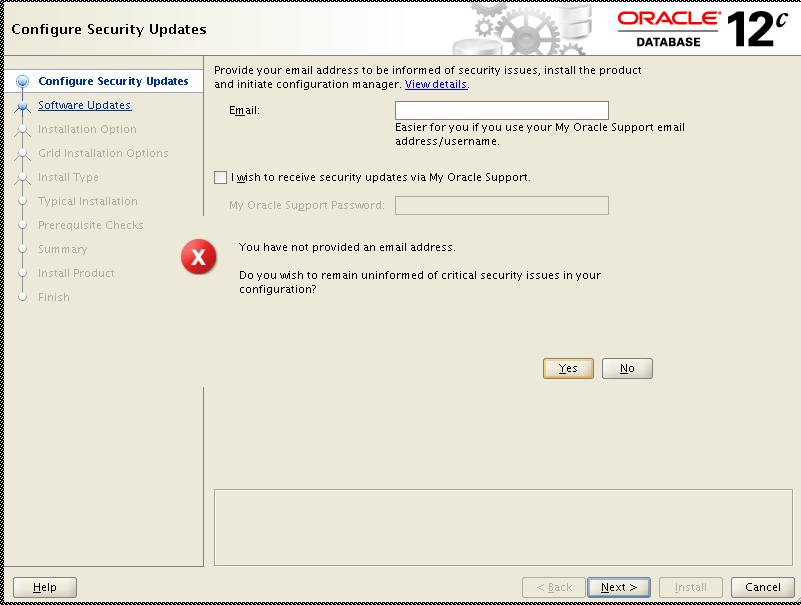
Preparing to launch Oracle Universal Installer from /tmp/OraInstall2013-09-05_09-28-14PM. Please wait ...


 uncheck the box and continue ................


    specify your Oracle Home & Software location


Click on “fix& Check again” then it will prompt you to run script, then open a new terminal and run the script and check “ignore All” button and continue.


After finished running, it will prompt you to run root.sh script. Open a new terminal and run the script as root user.


Friday, August 23, 2013

create SOURCEDEF file using Goldengate DEFGEN utility

Data definitions are needed when the source and target tables have different definitions or the databases are of different types.

Perform below steps on the SOURCE database from which you want to obtain metadata definitions.
From the Oracle GoldenGate directory, run GGSCI.

1.        In GGSCI, issue the following command to create a DEFGEN parameter file.
              
                      ggsci > Edit params defgen

                     defsfile ./dirsql/SOURCE_DEFGEN.def
                     userid gguser password ******
                     TABLE schema.*;

2.      Enter the parameters listed above in the order shown and invoke DEFGEN from GG_HOME location 

                   $ ./defgen paramfile ./dirprm/defgen.prm

              3.      Use FTP or SFTP to transfer this SOURCE_DEFGEN.def file to the TARGET server
            
              4.   Specify this copied SOURCE_DEFGEN.def file location in REPLICAT param file
                   ex: SOURCEDEFS ./dirsql/SOURCE_DEFGEN.def


For every DDL change happen to the source tables (only tables which are captured for replication)  generate a NEW sourcedef file and copied to the target server

NOTE:  Do not create a data-definitions file for Oracle sequences. It is not needed and DEFGEN does not support it.


Auto Scroll Stop Scroll